There are modes in which we can process the data in PIG
- Local mode
- MapReduce mode
During the processing of both the modes, MapReduce is getting executed.
Syntax for Local mode
$pig -x local (enter)
Syntax for MapReduce mode
Different flavors of PIG
- Grunt shell
- Script mode
- Embedded mode
Local Mode
|
HDFS Mode
|
pig –x local (enter)
|
pig(enter) OR pig –x mapred (enter)
|
Script Mode - Instead of running each and every command at grunt shell individually, we are going to include bunch of pig commands or statements in a single file, which generally ends with extension .pig and we are going to execute the single script only.
Local Mode
|
HDFS Mode
|
pig –x local <Script Name> (enter)
Ex: pig –x local FirstPigScript.pig
|
pig <Script Name>
Ex: pig FirstPigScript.pig
|
Embedded Mode- If we are not achieving the desired functionality by making use of the predefined transformations of PIG, we can generally go ahead with User Defined Functions (UDFs) of PIG.
Note: As a thumb rule, REGISTER statement should always be the first line of pig script
PIG data type

Normal Language Data type
|
Pig Latin Data type
|
Int
|
int
|
String
|
chararray
|
Float
|
Float
|
Long
|
Long
|
Double
|
double
|
Boolean
|
boolean
|
In this tutorial, I have put the example using both Local and MapReduce mode.
Consider the emp.txt file (Name, Age, Salary, City)

Consider the states.txt file (City, State)

LOAD the data into HDFS and its Variations
Variation 1 - Without column names or types
grunt> empData = LOAD 'emp.txt' USING PigStorage('\t');
After executing the above command, if user do
grunt>DESCRIBE empData;
It will show "Schema for empData unknown"
This is because, we have not assigned any columns to the table.
Variation 2 - With column names but without types
grunt> empData = LOAD 'emp.txt' USING PigStorage('\t') as (name, age, salary, city);
After executing the above command, if user do
grunt>DESCRIBE empData;
It will show the details as below
empData: {name:bytearray, age:bytearray, salary::bytearray, city::bytearray}
Variation 3 - With column names and with types
grunt> empData = LOAD 'emp.txt' USING PigStorage('\t') as (name:chararray, age:int, salary:int, city:chararray);
After executing the above command, if user do
grunt>DESCRIBE empData;
It will show the column names and types as assigned.
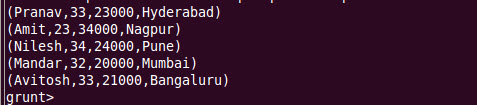
VIEW the data in HDFS
The command used to view the data is DUMP.
$DUMP empData;
This will execute the Map Reduce job and will show the data as below.
How to view selected columns in the table?
grunt>empData = LOAD 'emp.txt' USING PigStorage('\t') as (name:chararray, age:int, salary:int, city:chararray);
grunt>data = FOREACH empData GENERATE name, city;
grunt> DUMP data;

Note: If the column names and not specified, then indexes of the column can be used. e.g., grunt>data = FOREACH empData GENERATE $0, $3;
Here $0 indicates name column and $3 indicates city.
FILTERing the data
grunt>empData = LOAD 'emp.txt' USING PigStorage('\t') as (name:chararray, age:int, salary:int, city:chararray);
grunt>data = FILTER empData BY city=='Pune';
grunt> DUMP data;

Note: If there are more than one record found during filtering, then all the records will be listed, one below another as tuple.
GROUPing the data
grunt>empData = LOAD 'emp.txt' USING PigStorage('\t') as (name:chararray, age:int, salary:int, city:chararray);

Note: Group BY output will be in Nested format only.
SPLIT the data
grunt>empData = LOAD 'emp.txt' USING PigStorage('\t') as (name:chararray, age:int, salary:int, city:chararray);
grunt> DUMP B;
Output of A, showing list of employees having city as Pune.


ORDER the data: This will the sort the data as per given column.
Note: If there are more than one record found during filtering, then all the records will be listed, one below another as tuple.
GROUPing the data
grunt>empData = LOAD 'emp.txt' USING PigStorage('\t') as (name:chararray, age:int, salary:int, city:chararray);
grunt>data = GROUP empData BY city;
grunt> DUMP data; 
Note: Group BY output will be in Nested format only.
SPLIT the data
grunt>empData = LOAD 'emp.txt' USING PigStorage('\t') as (name:chararray, age:int, salary:int, city:chararray);
grunt>SPLIT empData INTO A if city=='Pune', B if age>23;
grunt> DUMP A; grunt> DUMP B;
Output of A, showing list of employees having city as Pune.
Output of B, showing list of employees having age greater than 23.
ORDER the data: This will the sort the data as per given column.
grunt>empData = LOAD 'emp.txt' USING PigStorage('\t') as (name:chararray, age:int, salary:int, city:chararray);


grunt>ordered = ORDER empData BY name;
grunt> DUMP ordered;
JOINS/COGROUP of data
grunt>empData = LOAD 'emp.txt' USING PigStorage('\t') as (name:chararray, age:int, salary:int, city:chararray);
grunt>states = LOAD 'states.txt' USING PigStorage(',') as (city:chararray, state:chararray);
grunt>joined = JOIN empData BY city, states BY city;
After joining, all the rows from both the tables will be fetched, which has matching records.

grunt>empData = LOAD 'emp.txt' USING PigStorage('\t') as (name:chararray, age:int, salary:int, city:chararray);
grunt>states = LOAD 'states.txt' USING PigStorage(',') as (city:chararray, state:chararray);
grunt>ljoined = JOIN empData BY city LEFT, states BY city;
After LEFT join, all the rows from left side left table along with its matching row in right side table will be shown. If NO matching record for left side table row is present in right side table, empty columns will be shown.
As shown below, city Mumbai does not have any matching row in states variable, hence empty columns has been shown.