Sunday, July 30, 2023

Hive Commands


Apache Hive has two kinds of table
1. Managed tables
2. External tables

1. Manage Tables - These are the tables which is getting populated from the files in local file system.

2. External Tables - These are the tables which is getting populated from files in HDFS path.

After inserting the data into Managed tables or External tables, the data will be part of HDFS only.


Below is the list of commands used in Hive for different purposes.

Create table Commands

Managed Table Creation

CREATE table <Table Name> <Schema definitions> 
row format delimited
fields terminated by <delimiter>
lines terminated by <delimiter>
stored as <File format>;

Example:


Data file in LFS has lines as below:

1, Pranav, 12000
2, Ashish, 13000
3, Nilesh, 14000
4, Ram, 15000
5, Karan, 16000

As per the data, create table statement would be as below:


 Create table ManagedTable(id int, name String, salary int)  
 row format delimited  
 fields terminated by ','  
 lines terminated by '\n'  -- not a mandatory statement
 stored as textfile;  


External Table Creation

CREATE external table <Table Name> <Schema definitions> 
row format delimited
fields terminated by <delimiter>
lines terminated by <delimiter>
stored as <File format> location <HDFS Path>;

Note: The difference between the syntax of External table and Managed table is of 2 keywords namely external and location


Load data into Hive tables


WordCount Program to show Top 10 searched words in PySpark

from pyspark import SparkContext

sc = SparkContext("local[*]", "wordcount")
sc.setLogLevel("ERROR")
input = sc.textFile("C:/Users/pranavwagde/Downloads/DE/BigData/search_data.txt")

# This will divide the file's data into multiple words, one below another
words = input.flatMap(lambda x: x.split(" "))

# convert each word to K,V format to count effectively
wordCounts = words.map(lambda x:(x,1))

# count the occurrences of each word
finalCount = wordCounts.reduceByKey(lambda x,y:(x+y))

# Sort the output by the no of occurrences, to get the words with the highest no of appearances
sortedOrder = finalCount.sortBy(lambda x: x[1],False)

# Take the top 10 searched words
top10MostSearchedWords = sortedOrder.take(10)

# Print the list
for word in top10MostSearchedWords:
print(word)


Courtesy: Frank Kane Udemy Course

Saturday, April 21, 2018

My first Spark Program for Word count using Scala

package com.sample.wc

import org.apache.spark.sql.SparkSession
import org.apache.commons.io.FileUtils
import org.apache.commons.io.filefilter.WildcardFileFilter
import java.io.File

object WordCount {
  def main(args: Array[String]): Unit = {
    // Creating the spark object
    val spark = SparkSession.builder().master("local").appName("Word Count").getOrCreate()
    
    //reading the text file and create the RDD
    val data = spark.read.textFile(args(0)).rdd
    
    //Split the line in the text file with space
    val wordsSplits = data.flatMap(lines => lines.split(" "))
    
    //Map each word to word,1, to ease the counting
    val wordMaptoOne = wordsSplits.map(value => (value, 1))
    
    //Count each word
    val count = wordMaptoOne.reduceByKey(_ + _)

    //Delete the output file, if already exists
    FileUtils.deleteDirectory(new File(args(1)))

    //Save the output file as text
    count.saveAsTextFile(args(1))

    //Stop the spark object
    spark.stop()
  }
}
Command to execute the Jar file // bin/spark-submit --class com.sample.wc.WordCount WordCounts.jar text.txt output

Sunday, February 21, 2016

Pig Tutorial

     There are modes in which we can process the data in PIG

  1.       Local mode
  2.       MapReduce mode
The difference between Local and MapReduce mode is latter requires the file to be in HDFS 
During the processing of both the modes, MapReduce is getting executed.

Syntax for Local mode
$pig -x local (enter)

Syntax for MapReduce mode
$pig (enter)


Different flavors of PIG

  •      Grunt shell
  •      Script mode
  •      Embedded mode
Grunt Shell – This is the default mode of pig execution, which is an interactive shell i.e., whether the output is success or failure, we will come to know the result immediately.Syntax
Local Mode
HDFS Mode
pig –x local (enter)
pig(enter)  OR pig –x mapred (enter)

Script Mode - Instead of running each and every command at grunt shell individually, we are going to include bunch of pig commands or statements in a single file, which generally ends with extension .pig and we are going to execute the single script only.


Local Mode
HDFS Mode
pig –x local <Script Name> (enter)

Ex: pig –x local FirstPigScript.pig
pig <Script Name>

Ex: pig FirstPigScript.pig

Embedded Mode- If we are not achieving the desired functionality by making use of the predefined transformations of PIG, we can generally go ahead with User Defined Functions (UDFs) of PIG.      

Note: As a thumb rule, REGISTER statement should always be the first line of pig script
                                
PIG data type   

Normal Language Data type
Pig Latin Data type
Int
int
String
chararray
Float
Float
Long
Long
Double
double
Boolean
boolean

In this tutorial, I have put the example using both Local and MapReduce mode.     


Consider  the emp.txt file (Name, Age, Salary, City)


Consider  the states.txt file (City, State)


LOAD the data into HDFS and its Variations
      
      Variation 1 - Without column names or types   
       grunt> empData = LOAD 'emp.txt' USING PigStorage('\t');
       
       After executing the above command, if user do 
       
       grunt>DESCRIBE empData;      
       It will show "Schema for empData unknown"
       This is because, we have not assigned any columns to the table.

      Variation 2 - With column names but without types 
      grunt> empData = LOAD 'emp.txt' USING PigStorage('\t') as (name, age, salary, city);

      After executing the above command, if user do

      grunt>DESCRIBE empData;
      It will show the details as below
      empData: {name:bytearray, age:bytearray, salary::bytearray, city::bytearray}
     
      Variation 3 - With column names and with types 
       grunt> empData = LOAD 'emp.txt' USING PigStorage('\t') as (name:chararray, age:int, salary:int, city:chararray);
      
      After executing the above command, if user do

      grunt>DESCRIBE empData;
      It will show the column names and types as assigned.


      VIEW the data in HDFS

      The command used to view the data is DUMP.
      $DUMP empData;

       This will execute the Map Reduce job and will show the data as below.


     How to view selected columns in the table?      
      
      grunt>empData = LOAD 'emp.txt' USING PigStorage('\t') as (name:chararray, age:int, salary:int, city:chararray);
      grunt>data = FOREACH empData GENERATE name, city;
      grunt> DUMP data;


      Note: If the column names and not specified, then indexes of the column can be used.    e.g., grunt>data = FOREACH empData GENERATE $0, $3;
      Here $0 indicates name column and $3 indicates city.
      
       FILTERing the data 

       grunt>empData = LOAD 'emp.txt' USING PigStorage('\t') as (name:chararray, age:int,      salary:int, city:chararray);
       grunt>data = FILTER empData BY city=='Pune';
       grunt> DUMP data; 


       Note: If there are more than one record found during filtering, then all the records will be listed, one below another as tuple.
       
       GROUPing the data
      
       grunt>empData = LOAD 'emp.txt' USING PigStorage('\t') as (name:chararray, age:int,      salary:int, city:chararray);
       grunt>data = GROUP empData BY city;
       grunt> DUMP data;  


       Note: Group BY output will be in Nested format only.

 SPLIT the data

 grunt>empData = LOAD 'emp.txt' USING PigStorage('\t') as (name:chararray, age:int,      salary:int, city:chararray);
       grunt>SPLIT empData INTO A if city=='Pune', B if age>23;
       grunt> DUMP A; 
       grunt> DUMP B; 

Output of A, showing list of employees having city as Pune.
       

      Output of B, showing list of employees having age greater than 23.
       
       
       ORDER the data: This will the sort the data as per given column.
       
       grunt>empData = LOAD 'emp.txt' USING PigStorage('\t') as (name:chararray, age:int,      salary:int, city:chararray);
       grunt>ordered = ORDER empData BY name;
       grunt> DUMP ordered;
       

       JOINS/COGROUP of data
       grunt>empData = LOAD 'emp.txt' USING PigStorage('\t') as (name:chararray, age:int,      salary:int, city:chararray);
       grunt>states = LOAD 'states.txt' USING PigStorage(',') as (city:chararray, state:chararray);
       grunt>joined = JOIN empData BY city, states BY city;

       After joining, all the rows from both the tables will be fetched, which has matching records.
       

       grunt>empData = LOAD 'emp.txt' USING PigStorage('\t') as (name:chararray, age:int,      salary:int, city:chararray);
       grunt>states = LOAD 'states.txt' USING PigStorage(',') as (city:chararray, state:chararray);
       grunt>ljoined = JOIN empData BY city LEFT, states BY city;
       
              After LEFT join, all the rows from left side left table along with its matching row in right side table will be shown. If NO matching record for left side table row is present in right side table, empty columns will be shown.
              As shown below, city Mumbai does not have any matching row in states variable, hence empty columns has been shown.


Saturday, January 16, 2016

Word count program in Pig


 inputdata = load 'Input-Big.txt' as (line:chararray);  
 words = FOREACH inputdata GENERATE FLATTEN(TOKENIZE(line)) AS word;  
 filtered_words = FILTER words BY word MATCHES '\\w+';  
 word_groups = GROUP filtered_words BY word;  
 word_count = FOREACH word_groups GENERATE group AS word , COUNT(filtered_words) AS count;  
 ordered_word_count = ORDER word_count BY count DESC;  
 STORE ordered_word_count INTO 'PigWordCount';  


The above pig script,

  • Load the input file into variable inputdata
  • Splits each line into words using the TOKENIZE operator. The tokenize function creates a bag of words. Using the FLATTEN function, the bag is converted into a tuple. 
  • In the third statement, the words are filtered to remove any spaces in the file.
  • In the fourth statement, the filtered words are grouped together so that the count can be computed which is done in fourth statement.
  • In the fifth statement, the word has been counted.
  • In the sixth statement, the result in being sorted as per count.
  • At last the sorted list is saved into output folder named 'PigWordCount'.


Friday, December 25, 2015

Oozie Installation and execution of sample map-reduce program using oozie

OOZIE Installation using tarball 


Below tutorial shows the installation process of OOZIE version 2.3.2.
We also require a ZIP file ext-2.2.zip.
You can download OOZIE tarball from cloudera website.

Kindly follow below steps to install OOZIE on Ubuntu OS.

1. On Command prompt, go to Hadoop Installation directory ( in my case : /user/lib)
2. Create the folder for OOZIE (root@ubuntu:/usr/lib#mkdir OOZIE)
3. Copy both ext-2.2.zip and oozie-2.3.2-cdh3u6.tar.gz into OOZIE folder.
4. Untar the oozie-2.3.2-cdh3u6.tar.gz file.

root@ubuntu:/usr/lib/OOZIE#tar -xzvf oozie-2.3.2-cdh3u6.tar.gz

5. This will create the oozie-2.3.2-cdh3u6 folder as below.


Note: I have used the user as root. We can perform the same operations for other users as well.
  • Change ownership of the OOZIE installation to root:root.
root@ubuntu:/usr/lib/OOZIE#sudo chown -R root:root ./oozie-2.3.2-cdh3u6

Start the oozie, to check if the installation has done properly.


  • Add ext-2.2.zip file to Oozie for user root through this command.


  • Update the core-site.xml with below values, for root.


NoteHadoop version before 1.1.0 doesn't support wildcard so you have to explicitly specified the hosts and the groups. <property>
<name>hadoop.proxyuser.root.hosts</name>
<value>localhost</value>
</property>
<property>
<name>hadoop.proxyuser.root.groups</name>
<value>root,hduser,etc.</value>
</property>

Note: After making changes to core-site.xml, restart hadoop without fail, using stop-all.sh and then start-all.sh commands.

OOZIE installation/setup completed.


Sample Map-Reduce program using OOZIE workflow

Along with the installation of oozie, we have got oozie-examples.tar.gz in oozie-2.3.2-cdh3u6 folder. This folder contains the sample program for Map-Reduce, Pig, etc.. We will use the program in map-reduce folder for our demo.
  • Untar the gz file. This will create the examples folder in oozie-2.3.2-cdh3u6 folder.
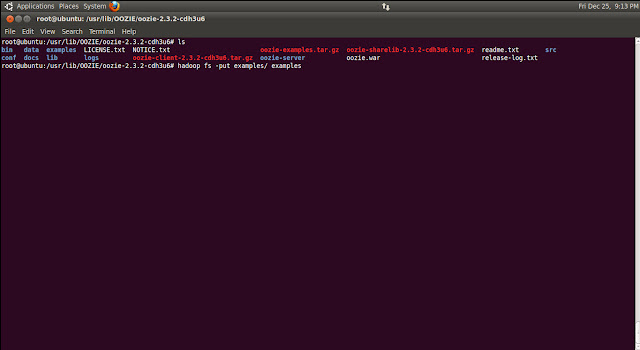
  • Copy the examples folder in HDFS.

  • Check the folder structure in HDFS as below. We are going to add these paths in workflow.xml.


  • Now go to examples folder in /usr/lib/OOZIE/oozie-2.3.2-cdh3u6/examples/apps/map-reduce and open job.properties and set the values as below.


  • Open workflow.xml file.


Go through this file and reconfirm if the values are set properly


  • Now start the oozie using below command.


  • Run the oozie command as below. If command is successful, job will be created.


  • Go to Oozie web console. Initially Status of the job will be shown as RUNNING. Once job completed successfully, Status will changed to SUCCEEDED.


  • Check the output in output-data folder.